Get Free Trial Week Developer Access, Try Before You Hire. Click Here to Claim Now

Stripe Payment Method Integration

What is the Stripe Payment method?
Building a web or mobile integration to accept payment online from anywhere has become the need of the time. We can manage the business through the Payment method, and Stripe is a provider that handles payment between merchant and user. Whether you want online payment, transfer payment, or other features, they all are available in Stripe.
Stripe has Multiparty payment options.
- Build a platform, marketplace, or any two-sided business with Stripe.
- Collect payment, then the payout
- Enable businesses to accept payments directly
- Pay out money
One Time Payment
One-time payment is an online transaction like e-commerce and related online platforms. Users can pay the admin through a payment method. Using stripes, we can quickly pay money using different types of methods. Here we can follow a few steps to make a payment to the admin easily.
1. Create Merchant Account
https://dashboard.stripe.com/register
2. Set Secret Key in Project from stripe account
https://dashboard.stripe.com/test/dashboard

3. Payment Gateway (Pay to Admin)
Here we can follow the steps to make a payment to the admin.
3.1 Create a token for the card
Create a single token to use the credit card's details used in place of a credit card dictionary and API method. We can use it once. We can create a new charge for this. This card token also passes a customer the I.D. of a card belonging to the customer. If you are not passing in a customer, this dictionary contains the user's credit card with the option described below:

There are two types of payment integrations instead of using the API.
3.1.1 Prebuild checkout page :
Code sample of integration with Stripe Checkout. The client & server side code redirects the payment page hosted on the Stripe account.

https://stripe.com/docs/checkout/quickstart
3.1.2 Custom payment flow :
Custom Stripe payment from your website or application. The client and server-side code build a checkout with Elements to complete payment using various payment methods.
https://stripe.com/docs/payments/quickstart
Accept payment using Stripe Elements and the Charges API (.net)
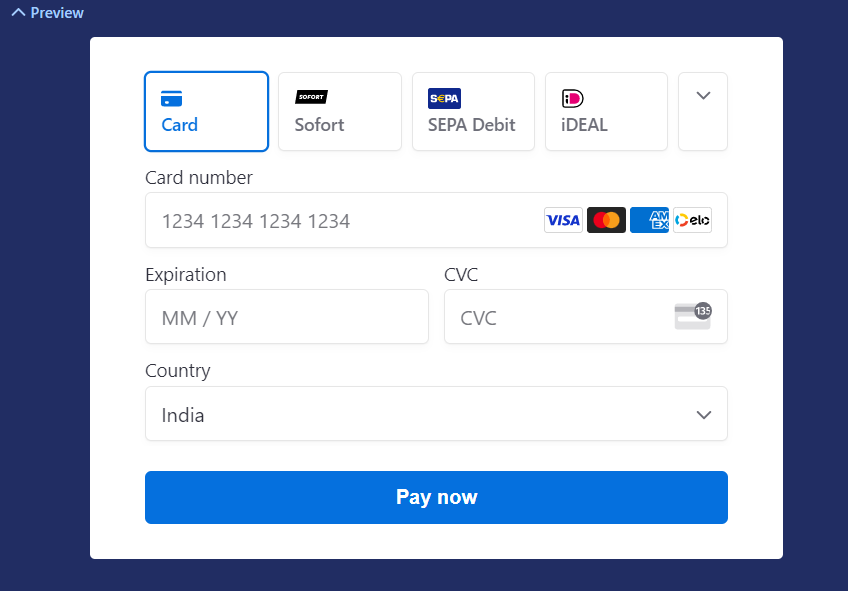
Use Stripe Elements & prebuilt U.I. components to create a payment form that lets you securely collect a customer's card details without managing the sensitive data. Card detail is then converted to a representative Token that can safely send to your server. Your server can use that token to create a new charge.
1) Set up Stripe
Use official libraries for access to the Stripe API from your application:
1.1) Command Line:

2) Create your payment form
To securely collect card details from your customers, Stripe Elements create U.I.components for you that Stripe hosts. They are placed into your payment form, rather than you creating them directly.
Set up stripe Element
To have Elements available on your webpage, add this script tag in the head of your HTML page:
2.1) Pyment.html:

That script should always be loaded directly from
Create an instance of Elements with the following JavaScript on your payment page:
2.2) client.js:

Once Elements is loaded, you can create an empty DOM container with a uniqueID within your payment form if you want Element to add this input field. We recommend placing that container within a <label> or next to a <label> with a for an attribute that matches a unique id of the Element container. By doing this, the Element automatically gains focus when the customer clicks on the corresponding label.
2.3) Payment.html :

When the form above has loaded then, create an instance of card Element and mount it to the Element containers created above describe:
2.4) client.js

Card Element simplifies the form and minimizes the number of required input fields that collects all necessary card details.
3) Create a Token
Add an event listener for your customer submits their card information and use Stripe.createToken(card details) to tokenize that information:
3.1) client.js :

Creating a Token that also accepts an optional second parameter containing additional card information collected from the customer is not used in this example. The function returns a result object. This object has either described:
result.token: a Token was created successfully.
result. error: there was an error, including a client-side validation error.
Refer to the API references for all possible errors. Suppose the object contains a result token; send it to your server. Otherwise, it will show the customer an error.
4) Submit the token to your server
Send a token to your server with any additional information that has been collected:
4.1) Client.js:

5) Create a charge with the token
After the client posts, the token is sent to your server, and you can use it to create a new charge. On your server, grab the Stripe token in the POST parameter submitted by your form. From there, it is one API call to charge the card:
5.1) .net C# :

The response from creating a new charge will either be a charge or an error with an error code. If the response succeeds, fulfill the customer's order and show them a success page. Otherwise, show them an error page.
6) Test your integration
If you can reliably enter a test card detail in your HTML form and submit it to the server, you see that your server created the charge then your integration is finished. Congratulations! You completed an actual payments integration with the Charges API. This API does not support scaling businesses or customers outside the U.S. and Canada.
Saving credit card details for later
You can create a new Customer instead of a Charge by providing their email address and tokenized card information.Be sure to store customer I.D. on your side for later use. You can subsequently charge that customer by passing the customer's I.D. instead of card representation in the charges request.
https://stripe.com/docs/saving-cards
User to User Money Transfer using Stripe

1) Create New Connected Account
Custom accounts can modify the connected account detail and set them through the API, including managing their bank account and payout schedule. Since Custom account holders can not log into Stripe, it's up to you to build the onboarding flow- user dashboard- reporting functionality, and communication channels.
1.1) Requirements for creating a custom account
Minimum API version: You must be using an API version at least 2014/12/17.
Terms of Service update: Created Custom accounts require an update to your terms of service must include a reference to the Stripe services agreement. Stripe recommends that you consult with your attorneys on whether you should update. In terms, accept languages to include reference to Stripe's terms.
Handling information requests: Instead of requesting information such as Social Security Number or passport scan directly from your user, Stripe requests the the information it needs from you. You must collect the information from your user and provide it to Stripe details. Otherwise, Stripe may disable payouts for that connected account.
Platform in a supported country: Platforms support in Australia, Austria, Belgium, Brazil, Bulgaria, Canada, Cyprus, Czech Republic, Denmark, Estonia, Finland, France, Germany, Greece, Hong Kong, Hungary, India, Ireland, Italy, Japan, Latvia, Lithuania, Luxembourg, Malta, Mexico, Netherlands, New Zealand, Norway, Poland, Portugal, Romania, Singapore, Slovakia, Slovenia, Spain, Sweden, Switzerland, Thailand, The United Kingdom and the United States can create Custom accounts for any country Stripe support.
1.2) Create a custom account
At the bare minimum, to create and connect the Custom account type to customize the account creation requests, provide a country & the appropriate capabilities.
1.2.1 Account Capabilities
The capabilities you request for a connected account determine the information need to collect for that account. To reduce onboarding effort & only request the capabilities you need. The more capabilities you request and the more information you must collect it.
1.2.2 Support Capabilities :
- Transfer
- Card payment
- U.S tax reporting
- Payment method
1.2.3 Create an account with multiple Capabilities:
Capabilities are set on the Account object. To find the list of available capabilities use the list-capabilities endpoint

1.3) Create a custom account using .net c#

The result of a successful API call is the user's account information received:

2) A required field for creating an account
Verification requirements differ based on this:
- The connected country accounts are created
- The capabilities connected accounts are requested
- The business type (for example, individual & company) and structure (for example, public corporation & private partnership)
- The service agreement type and connected accounts are under
As an added convenience and most arguments in the tables below are followed by a localized version - suitable as a label in your user interface.
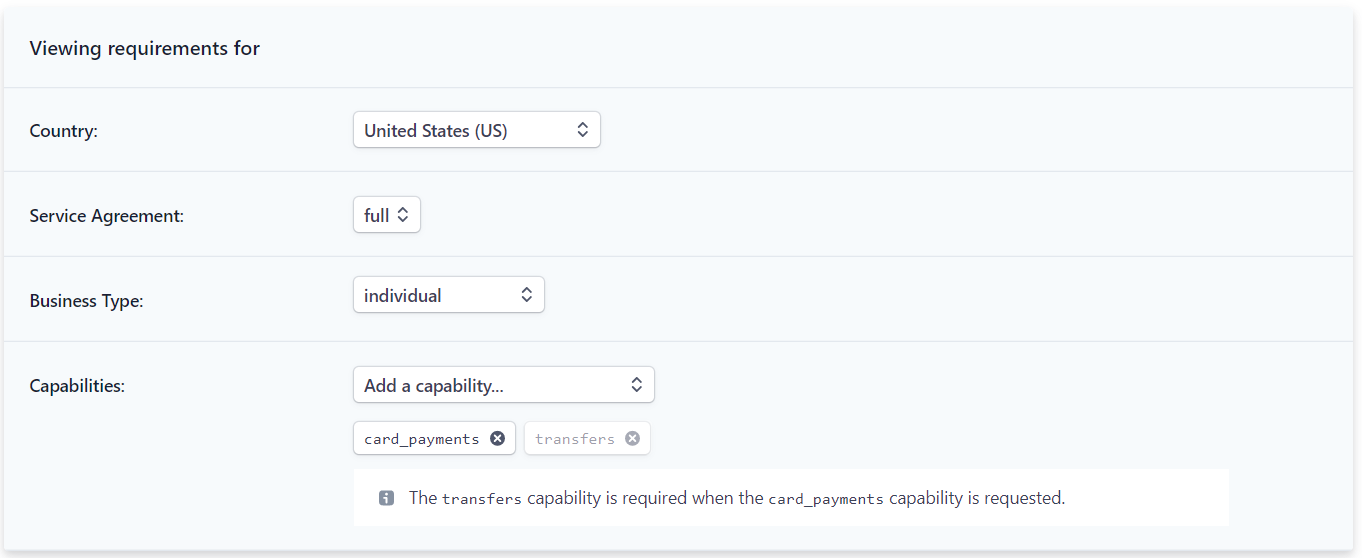
Minimum verification requirements for the United States (U.S.)
For Individual Business types, described below:
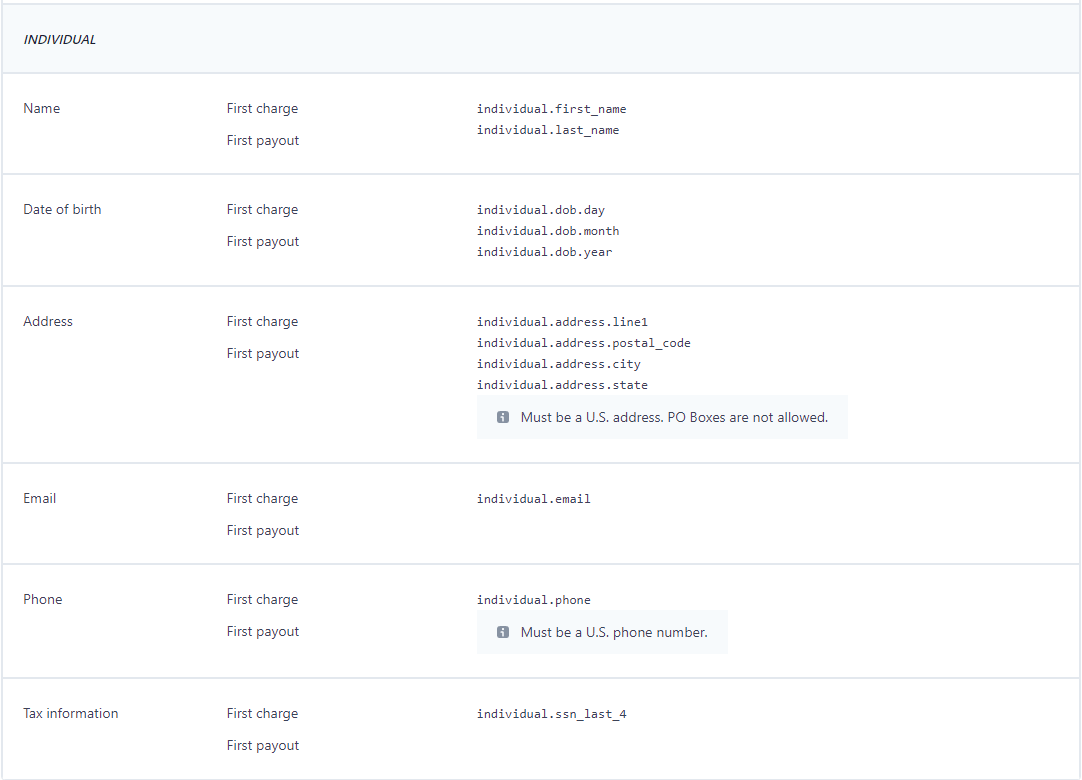
3) Create Person/Identity
This is an object representing a person with a Stripe account.
A platform cannot access a Standard / Express account's persons after the account starts on board, such as after generating an account link for this account. the Standard onboarding or Express onboarding documentation for information about platform prefilling and understanding the onboarding steps below.

3.1) Create Person
Create a personal account on Stripe under the admin(merchant) account

3.2) Update Person
Update a personal account on Stripe under the admin(merchant) account

4) List all connected accounts
Returns a list of connected accounts to your platform via Connect.
If you are not a platform, then the list is empty.

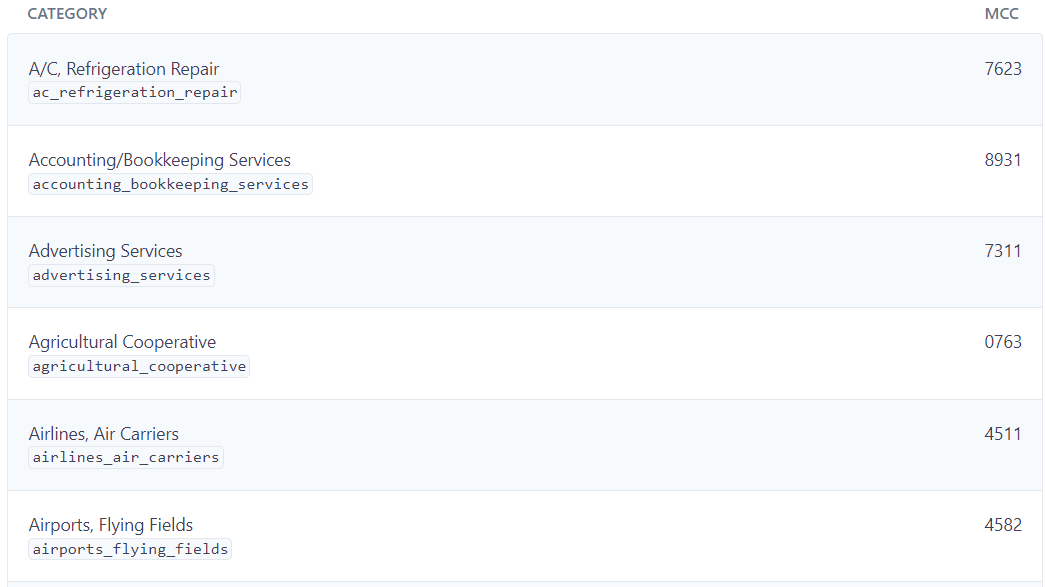
5) Merchant category codes / Industry details
MCCs classify the business by the type of goods or services they provide. For example, grocery stores, hotels, and airlines have different MCCs. These codes are often used for calculating interchange fees, authorizing payment and preventing fraud. so this is important that your connected accounts have MCC's that matches their business.
Each Stripe account has precisely one MCC. you can view MCC for a specific budget and you can retrieve the business profile.mcc field on the account objects.
Stripe automatically sets MCC codes for connected accounts, but you can choose to set for Custom and Express accounts.
5.1) Setting MCCs automatically
Stripe automatically evaluates accounts to determine appropriate MCCs. That means you don't need to build and maintain any custom logic. Generally, the industry is listed in the Stripe Dashboard for the connected. The account is used to determine MCC. This value is set during the onboarding flow for Standard and Express accounts in Connect Onboarding. You can set MCC manually for the account created with the API or set explicitly in the same way for Express accounts.
5.2) Setting MCCs manually
You can set MCC manually when you create an account. The example below use the code for Computer Software Stores (5734), but you can see a full list in the next section for code.

Merchant category code list :
Below is the list of supported MCCs you can use when creating newCustom or Express accounts sample.
6) Retrieve account for connected account details with status active/inactive :
Retrieves the details of an account.

7) The Payment Intents
The Payment Intents API to build for that can manage complex payment flows. It tracks a payment from creation through the checkout and triggers additional authentication step when it's required. Some of the advantages of using the Payment Intents API include described below:
- Automatic authentication handle
- No double charge
- No idempotency key issue
- Support for Strong Customer Authentications (SCA) and similar regulatory change
7.1) Create a PaymentIntent
After the Payment Intent is created, attach a payment method and confirm to continue payment. When confirmed, true is used during creation. It is equivalent to creating and confirm the Payments Intent in the same call. You may use any parameter available in the confirm API when confirm true is supplied.

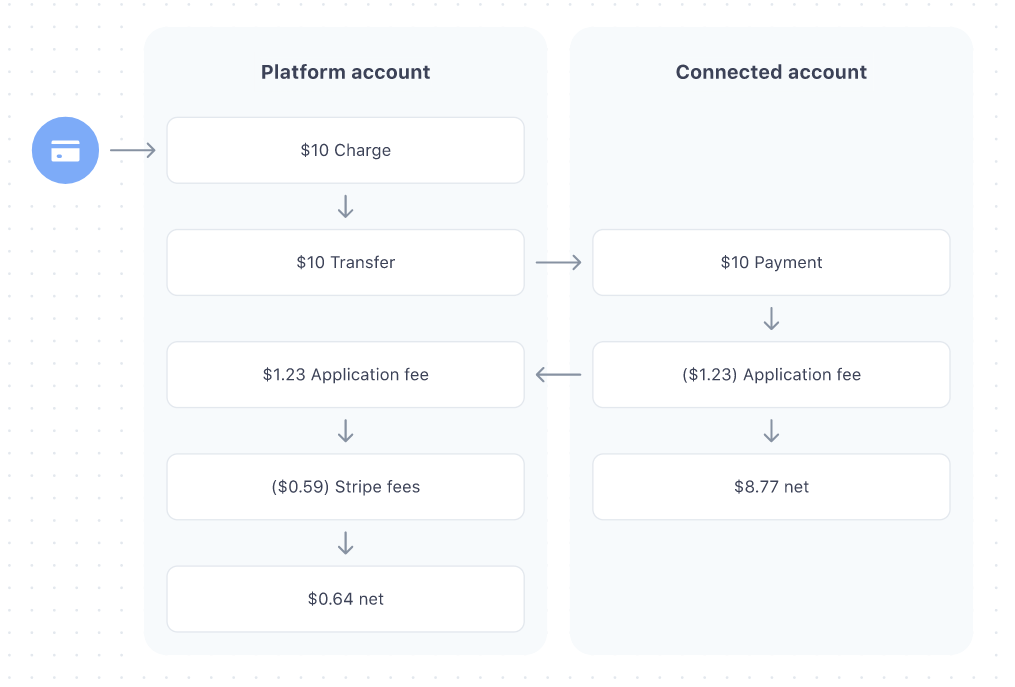
8) Collect payments, then pay out
Collect payment from customers and pay them out to sellers or service providers In this method, one user pays another user through Stripe. That time using a merchant Account as a Platform account. The first user pays $10 to the 2nd user. The platform account receives $10, and then the Platform account transfer amount of $10 to 2nd user with deduction of Stripe processing fees and platform account (merchant account) charges will be deducted. So, the 2nd user receives an amount of $8.77 from the 1st User. That's why this method is called to collect a payment, then the payout
9) Creating separate charges and transfers
Separate charges and transfers are recommended for Express & Custom accounts where you collect charges that can be a different amount than What's paid out to your connected account? The platform is responsible for Stripe fees - refunds and chargeback.
Create a charge and set up associated transfers, create a transfer group and assign the charge to the transfer group.


9.1) Transfer option
You can assign any value to the transfer-group string, but it must represent a single business action. You can also make a transfer without either an associated charge or a transfer group for example: when you must pay a provider but there are no associated customer payments.
The platform is:
- Does not have to transfer the same amount as the original charge
- Transfer a maximum of the platform's available account balance (with an exception when using source transaction)
- Must be configured to use manual payout or a combination of automatic payout and the source-transaction parameter to ensure the account has sufficient funds to cover the transfer amount
9.2) Collecting fees
When creating charges on your platform and separately creating a transferThat platform can earn money by allocating less of the charge amount from Stripe account. Assuming that represents a delivery service the transaction with a charge to the customer of 100 USD, a transfer Of 20 USD to the delivery person and a transfer of 70 USD to the restaurant
The charge amount less the Stripe fee is added to the platform account pending balance. When the available platform balance is sufficient (at least 90 USD), Transfers can be made, reducing the platform available balance by the specific amount and increasing both connected accounts available balance by that same amount Assuming standard U.S. Stripe fees, the platform retains an additional
6.80 USD (100.00 USD - 70.00 USD - 20.00 USD - 3.20 USD)

9.3) Refund charges
The charge created on your platform can be refunded using your platform secret key. However, refunding a charge has no impact on any associated transfers. It is up to your platform to pay the amount owed back to your platform by reducing subsequent transfer amounts or by reverse transfer

10) Create a Bank Account for Connected User Accounts. So, the user can receive the amount from other user funding
When you create a new bank account, you must specify a Custom account to create it.If the bank account owner has no other external account in the bank account currency, a new bank account will become the default for the currency. if the owner already has a bank account for that currency, then the new account will become the default only if the default-for-currency parameter is set true
10.1) create a bank account token
Create a single-use token that represents bank account details. This token can be used with the API method in place of a bank account Dictionary. The token can be used only once by attaching it to a Custom account.

10.2) Stripe Services Agreement acceptance
Stripe requires all Custom accounts to accept their service agreement. The service agreement users must accept depends on which service agreements type their account under Stripe. You can change the type of service agreement until they accept it. It is your responsibility to make sure your user agrees to the correct service agreement before accepting or receiving payment through Stripe on your platform.
User must consent once again to the Stripe Services Agreement (SSA) if they update their tax identification number. If you allow an account to changes its verified tax identification number, then you must make sure that the account agrees once again to the Stripe Services Agreement (SSA) by following this instruction to confirm that it accepts transfers of ownership of their account and its balance from the entity assigned the initial Tax ID to the one given the new Tax ID.
11) Retrieve Stripe account balance
Retrieve the current accounts balance based on the authentication that was used to make the request.

12) Testing Stripe Connect
Before going live, you have to test your Connect integration for account creation, Identity verification and the payout are necessary.Use testing to make sure your Connect integration handles different flows Correctly without mistake. test mode to simulate live mode while taking advantage of Stripe provides a unique token to use in your test. Take a look at payments testing guide for more details & information on a testing charge, dispute, and more features.
12.1) Create test accounts
You can create multiple test accounts and use any account type you need (for example, representing multiple countries, etc.).
12.2) Test the OAuth flow Express accounts standard accounts
You can test your OAuth integration for Express and Standard account creations with the development client id.
Your development client id is ex.ca_FkyHCg7X8mlvCUdMDao4mMxagUfhIwXb; will be able to find this in your Connect setting.
Your development client id allows you to follow the following:
- Set your redirect_uri to a non-HTTPS URL
- Set your redirect_uri to localhost
- Force-skip the account form instead of having to fill out an entire
- account application (Standard)
- Auto-fill 000 000 0000 as the test phone number and 000-000 as the SMS code when prompted (Express)
- Get test access tokens for connected accounts
12.3) Identity and address verification press accountsCustom accounts
After creating a test-connected account, you can use a token to test different verification status to ensure you are managing different requirement and reports. You can use the following token to test verifications with Custom & Express accounts. You need to provide real information to activate Standard connected accounts.
Check the below steps:
- Test dates of birth
- Test addresses
- Business address validation
- Test business addresses
- Test personal I.D. numbers
- Test business tax I.D.s
- Test identity documents
- Test document images
- Test file tokens
13) Refunding and canceling payments
You can refund charges made to your accounts anytime, in whole or part. Refund using your available Stripe balance. this does not include any pending balance. If you have available credit that does not cover the amount of the refund, Stripe debits the remaining amount from your bank account.
If Stripe can not do this from your bank account, your Refunds go into a pending status until you add funds to your Stripe balance. You can view a list of all your pending refunds in the Dashboard.
We submit a refund request to your customer bank or card issuer. Your customer views the refund as a credit of approximate 5-10 business days later, depending upon the bank. Refunds can not be canceled after they are issued. Disputes and chargebacks are not possible on credit card charge that is fully refundable.
If all of these conditions apply:
- The original charge was created on a Customers object in your Stripe account
- The Customers object has a stored email address
- You have Emailed the customer for a refund enabled
13.1) Using the API
To refund a payment using API, create a Refund and provide the I.D. of the charge or Payment Intent to be refunded.

To refund part of a Payment Intent, provide an amount parameters as an Int in cents (or the charge currency small currency unit):

13.2) Canceling a Payment Intent
To cancel a Payment Intent, you no longer intend to use for collect payment, call the endpoint to cancel Payment Intent. Note that to keep a Payment Intent in an incomplete status like requires-confirmation or requires-payment-method, since completing Payment Intents can be useful to understand the conversion rate at checkout.
Once canceled, the Payment Intent will make no additional charge and any operation on the Payment Intent will fail with an error. For Payment Intent with status is' requires capture, the remaining amount-capturable will automatically be refunded.

Conclusion
Using the Stripe payment gateway, create a single payment for the user to pay to the admin. e.g., e-commerce website payment (customer pay for product)Stripe provides many features of payment gateway. We can use the prebuild checkout feature from Stripe. We can configure it in Our project starts using a stripe payment gateway. In this document, there are two types of payment: pay-to-admin and user-to-user payment transfer (accept payment using stripe elements and the charges API using .net technology. Using this step, we can create a charge, or token, add a customer, add bank details, check balance, refund process, etc., using asp.net API
For more help connect with our Experts or Hire Dedicated Developers from us.

Ruchir Pandya
Delivery Head of Web
Ruchir Pandya is a seasoned software and business professional with over 15 years of experience in IT, Software Development, and operations. As the overseer of the Open-Source Web department (PHP Department), he takes charge of development and operations.


Subscribe to Our Newsletter!
Join us to stay updated with our latest blog updates, marketing tips, service tips, trends, news and announcements!