Get Free Trial Week Developer Access, Try Before You Hire. Click Here to Claim Now

Apple Pay Integration in iOS App

Apple launched their own mobile payment feature, Apple Pay, in October 2014. Since then, it is gaining a large amount of payment transactions around the world. Apple Pay contains multiple layers of dynamic encryption and is also protected by TouchID, Apple’s fingerprint technology. Apple is looking to grow its Services business, and Apple Pay appears to be a key driver of its revenue growth.
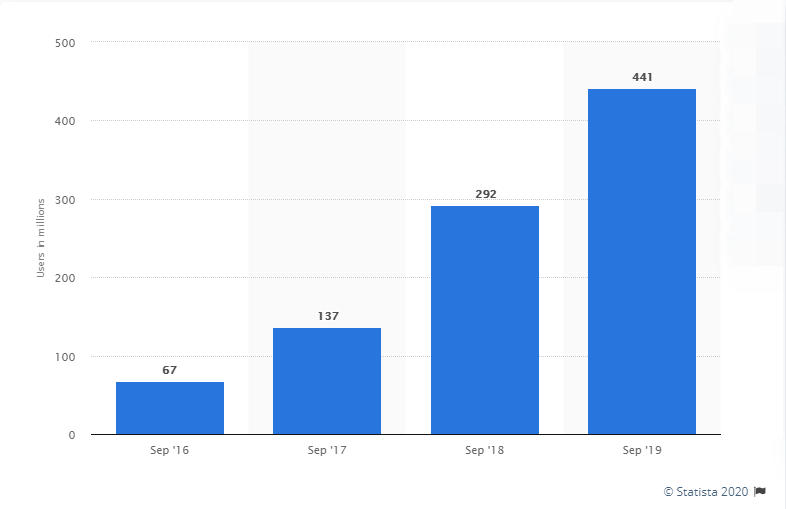
A report from Stastita suggests, as of Sep 2019, there were approximately 441 million Apple Pay users worldwide, up from 292 million users in the corresponding period of the previous year. An estimated 48 percent of iPhone users had enabled Apple Pay.
Apple Pay is responsible for around 5% of card transactions. Over the next five years this is expected to grow to 10%, as suggested by reports. Eventually, it’s assumed that Apple Pay could be competing with the key player of payment processing like PayPal.
Here at ManekTech, our iOS App Developers also integrate Apple Pay into various mobile applications for getting payments and for various business purposes. Let’s take a look on how to integrate Apple Pay into your iOS mobile application.
There are mainly 3 steps to set up your environment to implement Apple Pay in your apps:
1. Create a merchant ID.
2. Create a Payment Processing certificate.
3. Enable Apple Pay in Xcode.
Required Role: ‘Account Holder’ or ‘Admin’.
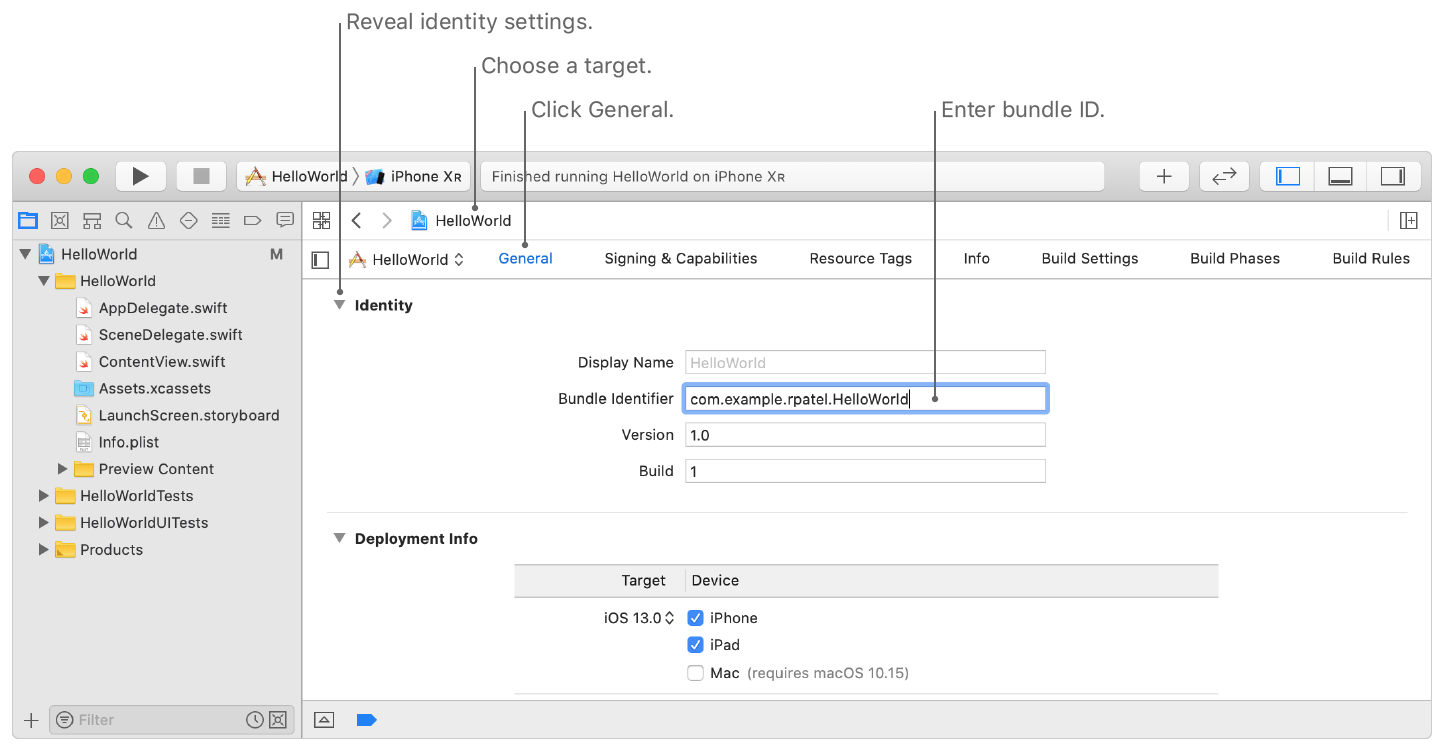
Before we create a merchant ID, we’ll need a unique Bundle Identifier for your app. In the app settings, go to the identity and put your own bundle identifier as you would if you were making your own app (e.g. com.yourname.app-name).
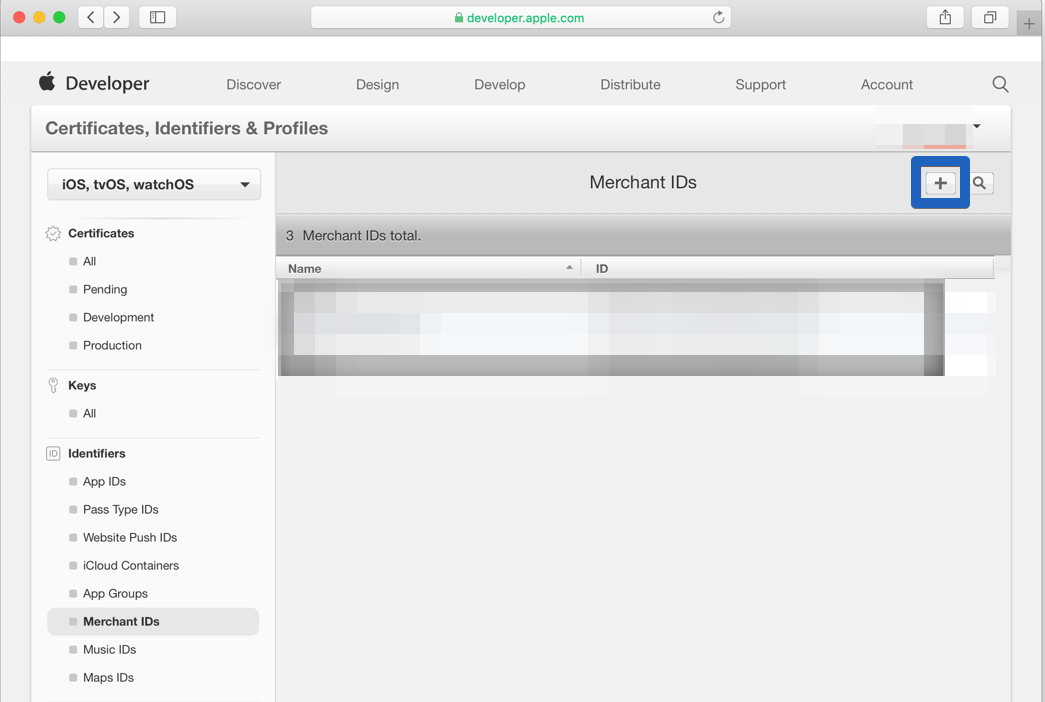
Step - 1. To register a Merchant ID
A merchant identifier uniquely identifies you to Apple Pay as a merchant who is able to accept payments. You can use the same merchant identifier for multiple native and web apps. It never expires.
1. In Certificates, Identifiers & Profiles, select Identifiers from the sidebar, then click the Add button (+) in the upper-left corner.
2. Select Merchant IDs, then click Continue.
3. Enter the merchant description and identifier name, then click Continue.
4. Review the settings, then click Register.
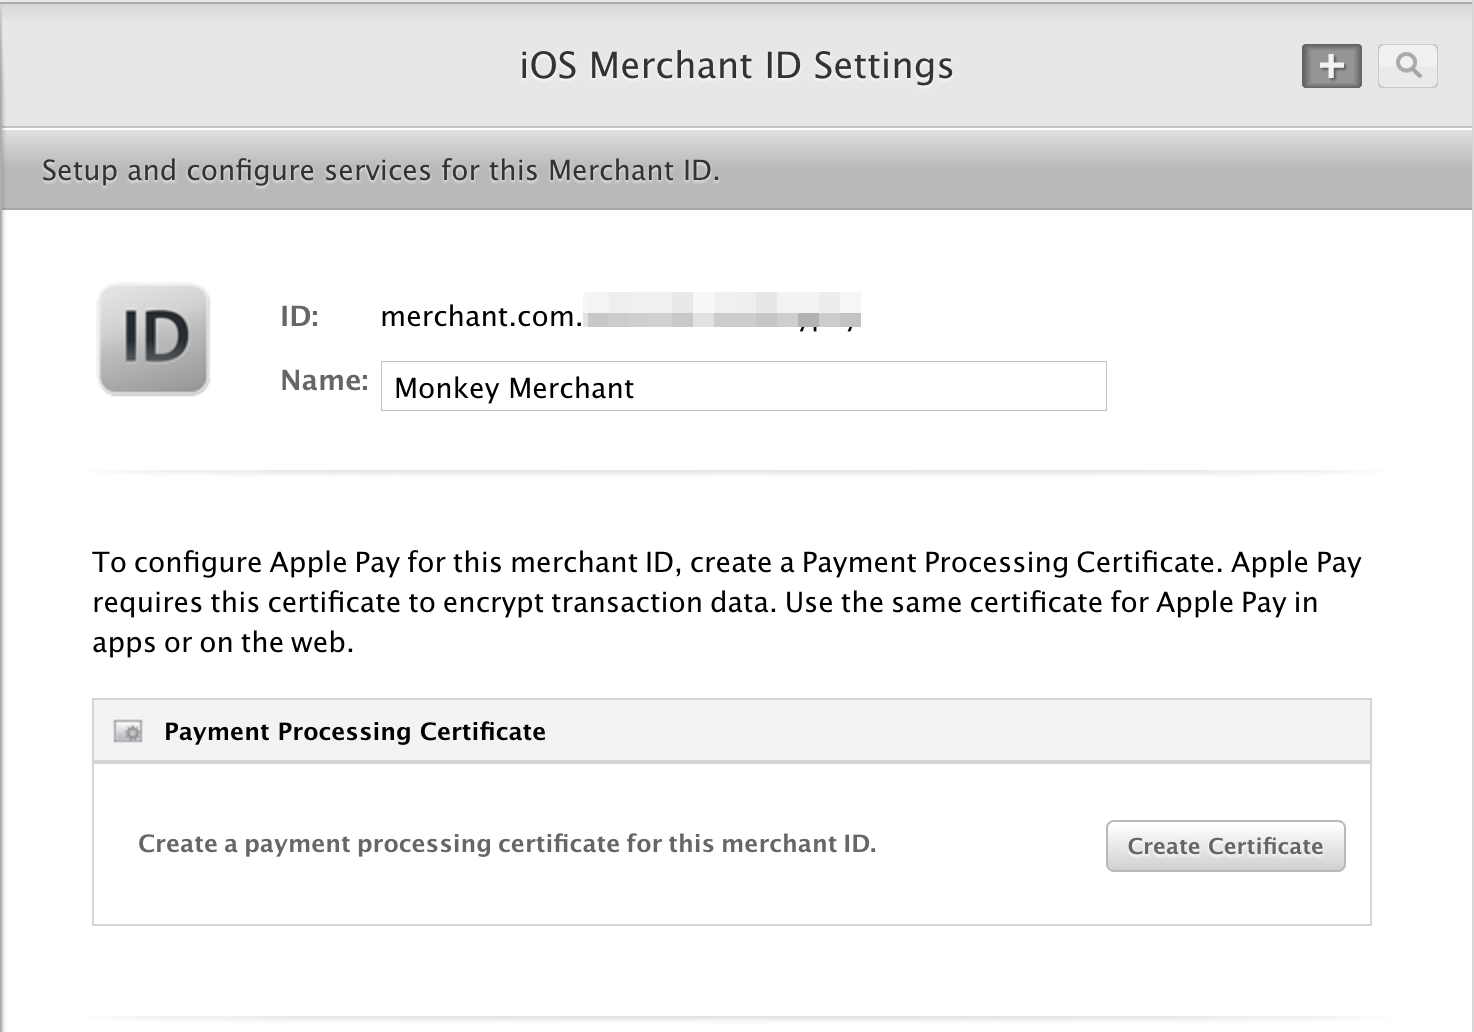
Step - 2. To create a Payment Processing certificate
A payment processing certificate is associated with your merchant identifier and used to encrypt payment information. The payment processing certificate expires every 25 months. If the certificate is revoked, you can recreate it.
1. In Certificates, Identifiers & Profiles, select Identifiers from the sidebar.
2. Under Identifiers, select Merchant IDs using the filter in the top-right.
3. On the right, select your created merchant identifier.
3.1. Note: If a banner appears at the top of the page saying that you need to accept an agreement, click the Review Agreement button and follow the instructions before continuing.
4. Under Apple Pay Payment Processing Certificate, click Create Certificate.
5. Create a certificate signing request on your Mac, and click Continue.
6. Click Choose File.
7. In the dialog that appears, select the certificate request file (a file with a .certSigningRequest file extension), then click Choose.
8. Click Continue.
9. Click Download.
10. The certificate file (a file with a .cer file extension) appears in your Downloads folder.
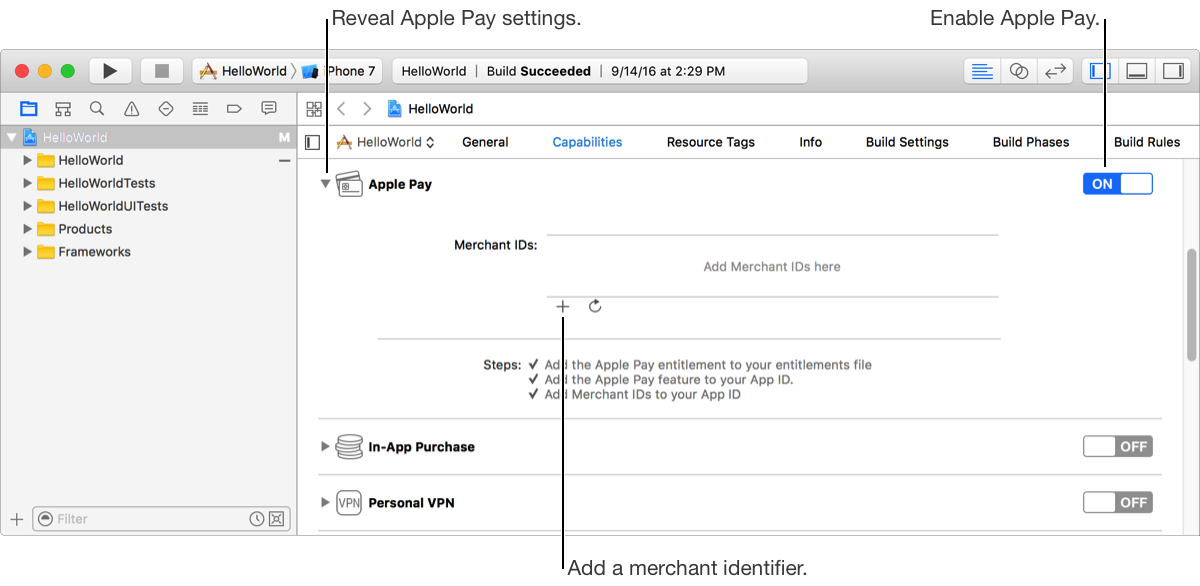
Step - 3. Enable Apple Pay in Xcode.
To enable Apple Pay for your app in Xcode, open the Capabilities panel. Select the switch in the Apple Pay row, and then select the merchant IDs you want the app to use.
Apple Pay is enabled, so now we can proceed further to the coding part
CODING PART
First open your Main.storyboard and add a button. Then proceed to the ViewController.swift.
To start coding, first we have to import the PassKit library by adding: import PassKit
Open the ViewController.swift file, and inside the class, add the following function:

This will simply display an alert with a simple dismiss action. We’ll use this to display info to the user as they go through the Apple Pay process. Now, create IBAction for the button, “buyClicked” method:

Next, we have to create an instance of the class PKPaymentRequest. Add the following lines into the file:
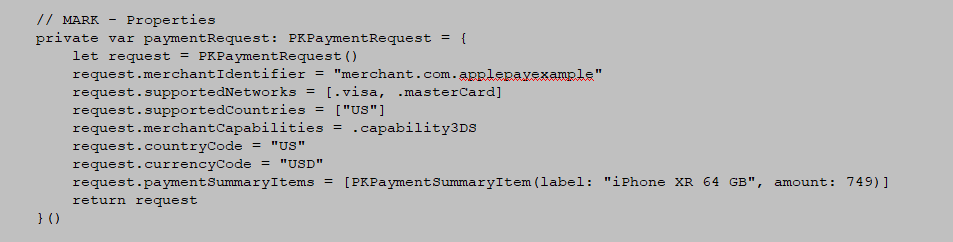
Let’s take a close look at this.
Line 1 verifies your merchant ID. Make sure to change it and input the name of the merchant ID you created.
Lines 2 and 3 establish the supported payment networks and supported country.
Line 4 checks the capability of the transaction. “PKMerchantCapability.capability3DS” uses the 3-D Secure protocol, a secure way of processing the cards.
Lines 5 and 6 provide currency and country code.
Lastly, line 7 establishes the payment item, you can change it as per your need.
Here, we have just specified the basic information; you can add more information in the request as per your need, such as the billing information, shipping methods,etc. Check the full list of properties of the “PKPaymentRequest” that are supported and you can customize it as per your need.
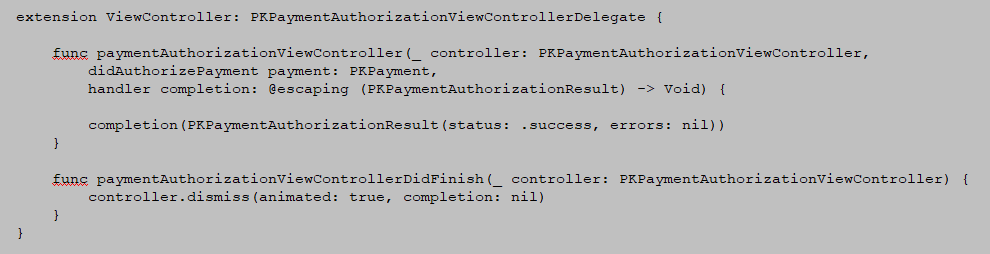
Now, add following lines to create an object of ‘PKPaymentAuthorizationViewController’ on button click,.

We have to subscribe for a delegate for ‘PKPaymentAuthorizationViewController ’, so that we can get the transaction status. After that, we have to implement the delegate’s methods. We will simulate a successful transaction in the following way:
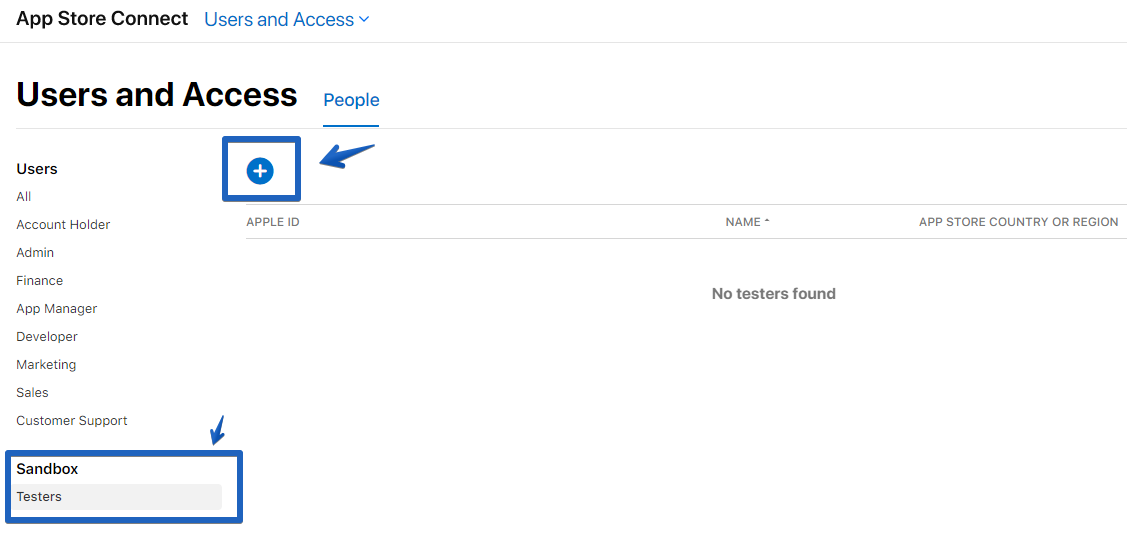
Now we are ready to test the Apple Pay integration. Before testing the Apple Pay, it’s necessary to authorize it with the help of a Sandbox user.
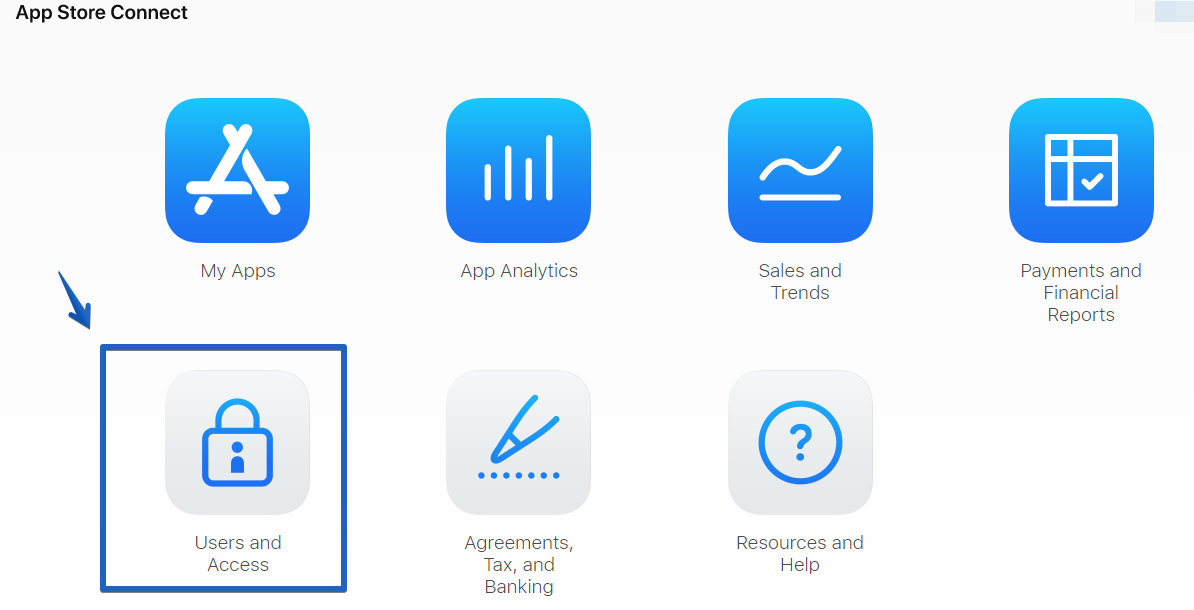
To create a Sandbox user, go to https://appstoreconnect.apple.com, open ‘Users and Access’ section, choose Testers in the Sandbox section and create a test user by tapping on the ‘+’ button and filling the necessary details.
Step-1: Users and Access section,
Step-2: Testers section
You can get the test cards to use for testing purpose from here,
1. Test Cards for Apps: https://developer.apple.com/apple-pay/sandbox-testing
Apple Pay is supported in certain devices and certain countries, please check official links below,
1. Supported Devices: https://support.apple.com/en-us/HT208531
2. Supported Countries: https://support.apple.com/en-us/HT207957
You can check our demo app’s source code here, https://github.com/manekdilip/ApplePay_iOS-Swift
Conclusion
Apple Pay is predicted to be a revolution in terms of handling payments in the iOS apps. You can integrate Apple Pay into the iOS app which is one of the easiest ways for merchants to improve user experience for In-App payments.
We at ManekTech can help you tapping into the market by integrating Apple Pay into your apps. Choose our iPhone app developers from a pool of talents on-board and hire for your business needs and we will get you an outstanding iOS application.

Nikhil Solanki
Mobile Lead
Nikhil Solanki has 10+ years of experience in App Development and currently works as the Mobile Lead at ManekTech. He is an experienced Mobile lead with a demonstrated history of working in Mobile's information technology and services industry.


Subscribe to Our Newsletter!
Join us to stay updated with our latest blog updates, marketing tips, service tips, trends, news and announcements!